Start Here
Welcome to Human API!
We've provided some guides to help get you up and running as quickly as possible, and we're excited to have you aboard. What follows is a technical explanation of the Human API integration process. For a higher-level view, check out What is Human API?
Integration Overview
Integrating Human API into your application involves three main components of our platform:
- Connect - UI to facilitate data source connections
- Authentication service - A web service to mint tokens for your users
- Data API - Endpoints to pull users' data from
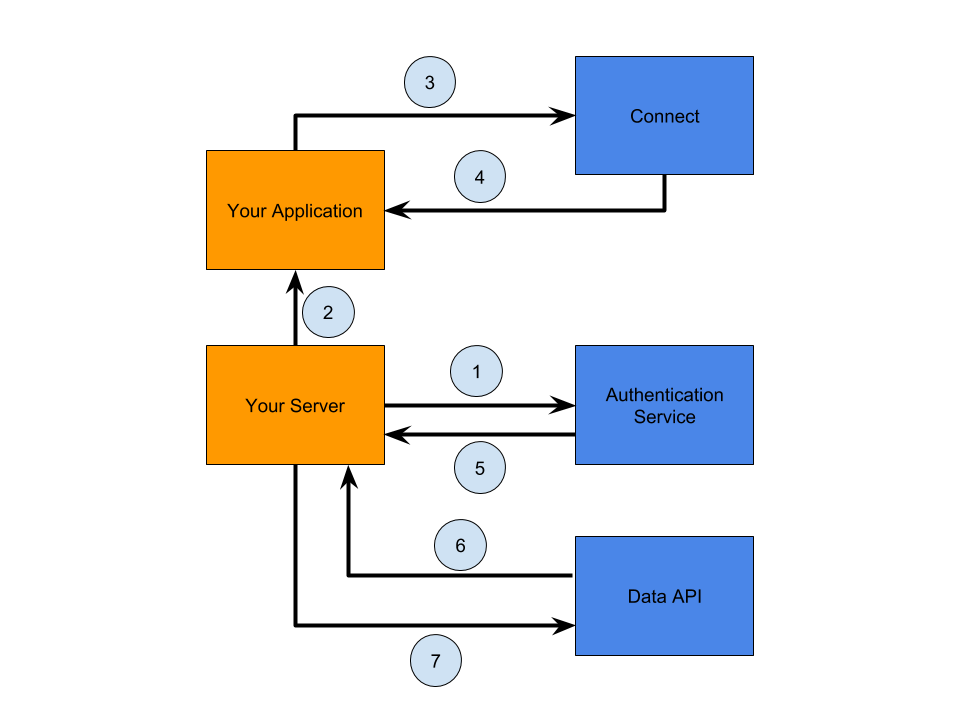
To grasp how an integration with Human API works, it is helpful to view the following diagram:

Above, we are assuming you have a server side and a client side application (both in orange). Human API's components and actions are in blue.
1: You call our authentication service to request a token for your user.
2: You pass the token to your client-side application.
3: You launch Connect from the browser's window. The user can interactively search and connect available data sources.
4: Connect calls back your app when the user is done.
5: You call our authentication service to get an access token for your user.
6: You get notifications when Human API retrieves data from the source. (This step is optional).
7: You call our Data API to fetch the user's data.
No matter what or how many sources the user connects, you'll end up with a single set of Human API credentials and one normalized API to query all of that user's data.
Let's get started!
Setting Up Your Access Credentials
First, you'll need credentials for the Portal. Please contact your sales representative at Human API for a set. If you do not know your sales representative, please contact [email protected] to perform your request. Your contact at Human API must create applications on your behalf.
An application in Human API is a container that holds users and their data, and allows for custom configuration options. Above all, it is the main pipeline that you will integrate directly with your application.
Each application has a specific set of keys found on the application's settings page that you'll need for development, as described below:
| Key | Description |
|---|---|
| Client ID | Unique ID of the application container |
| Client Secret | Secret value for the application container |
Secure Values
Your Client Secret should be kept securely on your server. For developer support requests, please send along your Client ID only. We will never ask you to provide your Client Secret.
Now that you have access credentials through the Portal, everything is in place to start the integration.
Next up, integrating Connect!
Updated over 6 years ago
